If you’re learning how to draw, then you’re probably wondering how to use a kneaded eraser.
In fact, chances are good that you haven’t even heard of a kneaded eraser before. You’re familiar with the pink erasers that you’ve used since you were little to erase mistakes that you make in pencil, but a kneaded eraser is something else.
This flexible, versatile drawing tool is an essential part of every artist’s supplies. Using it requires practice, and the better you are at using it, the more distinctive and memorable your drawings will be.
Keep reading to learn more about kneaded erasers.
What Is a Kneaded Eraser?
You’re probably familiar with rubber or vinyl erasers like those that you used in school, but kneaded erasers are different. Unlike these other types of erasers, a kneaded eraser is able to be compressed, molded, and stretched into any shape.
Sometimes referred to as putty rubber, these erasers may be made of rubber but they have not been cured or vulcanized like other rubber erasers. This means that they can be worked like putty.
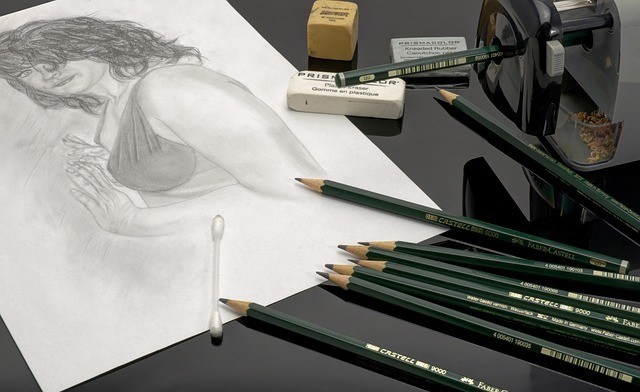
Artists may use kneaded erasers to erase marks that were made with chalk, pastels, charcoal, and graphite. Similarly, kneaded erasers can be used to create highlights in drawings made with these materials.
Why would you want to use a kneaded eraser rather than a regular, vulcanized eraser? One of the most important factors that kneaded erasers possess is that they do not leave eraser residue behind on your drawings.
Additionally, kneaded erasers are far easier to clean than typical erasers. Perhaps most critically, a kneaded eraser can be shaped into an endless variety of configurations. This lets you use a tiny, exacting tip of the eraser or a large blob to clean up huge spots of smudging.
Once you have gotten comfortable with kneaded eraser use, you’ll wonder how you ever got along without one of these tools.
How to Use a Kneaded Eraser
Now that you know what are kneaded erasers for, it’s time to discover more about how they are used.
If you have just purchased a new kneaded eraser, remove it from its packaging. Right now, it’s probably a flat square, and it may not necessarily feel very malleable.
This is because it is necessary to break in kneaded erasers before you start using them.
Start pulling the kneaded eraser between both of your hands. You can pull vigorously without fear. If pieces of the eraser break off from the hole, that’s to be expected. Just knead those pieces back into the main part of the eraser.
If you feel like the entire kneaded eraser is too large for your hand or for the drawing that you are working on, feel free to rip off just a small section of the eraser. Many artists do this so that they effectively get several erasers with the purchase of one kneaded eraser.
Once the eraser is feeling soft and malleable, it is ready for use. All of these techniques will probably take some practice before you are comfortable with them, so don’t be afraid to experiment.
Let’s explore some of the most common techniques that require the use of a kneaded eraser.
The Pencil Point
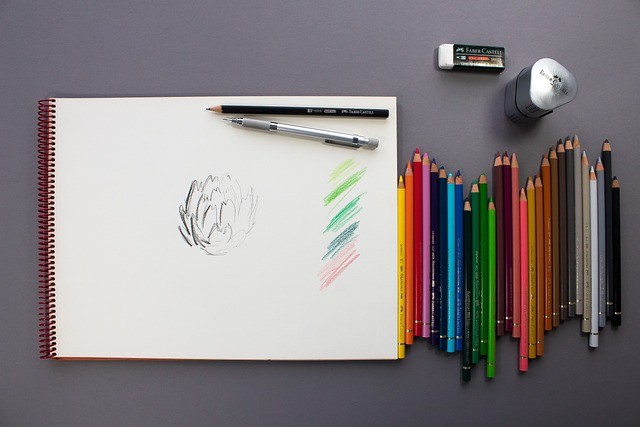
One of the main advantages of using a kneaded eraser is that it can assume any shape that you need it to. This means that you can squeeze and shape it at one end to make a surprisingly fine point. Accordingly, you are able to add tiny details and highlights.
The point of the eraser can be dabbed against the drawing three or four times to lighten a particular area. It may make sense to knead the point back into the eraser after touching up each spot. This way, you will not transfer any of the drawing medium that is picked up by the eraser’s point to other areas of your drawing.
The Sharp Edge
If you have taken a drawing course, then you were probably introduced to concepts like color, composition, and edges.
Edges make an appearance in art whenever there is a transition from one subject or object to another. They also show up to mark the transition between one plane or face of a subject to another plane or face. Edges similarly may mark a transition between colors.
It can be exceptionally challenging for new artists to effectively use edges in their work. Fortunately, they can shape their kneaded eraser to give them some help.
With this technique, you basically shape the kneaded eraser into a sharp, flat edge. This edge may be used to erase sharp lines, create sharp lines, or make an edge sharper and cleaner.
Dabbing
Sometimes, the shape of the kneaded eraser is not as critical as how it is applied to the paper. With this technique, the artist can press or dab the graphite or charcoal to lift some of it off the page. You can keep dabbing as much as you like until you have removed the right amount of drawing material.
Press and Lift
When a dab isn’t quite enough, then you may want to try the pressing and lifting methods. Some artists just delicately press the eraser onto the paper in the desired spot. Next, they carefully lift the eraser away, taking care not to wipe across the drawing.
Note that this technique involves slightly more pressure against the page than dabbing, but could involve less or about the same amount of pressure as is used in wiping.
In any case, it generally is not necessary to use a lot of force or pressure.
Wiping
Sometimes your drawing needs more than a few dabs with the eraser. This may be the case when your drawing has acquired too much smudging.
Wipe gently while holding the paper steady with your other hand. Try to rub from the center of the page toward the edge to protect against crumpling the edges.
Highlighting
You think of your chalks, pastels, and charcoal as being the real drawing tools in your kit, but the reality is that your kneaded eraser can be just as integral to the success of your work.
To use your kneaded eraser like a drawing tool, lay down darker tones on your page using graphite, charcoal, or the other medium of your choice. Then, use the eraser to soften the tones and edges to finish your drawing.
You also may want to use your eraser to lighten a small portion of your drawing, such as light reflecting off of the eyes of a portrait’s subject.
How to Clean a Kneaded Eraser
Cleaning a kneaded eraser is quick and easy. If you are in the middle of working on a drawing and do not want to do a complete cleaning, then just fold and knead the eraser a little bit so that you can uncover a clean eraser surface and keep working.
However, if your eraser is looking pretty dirty or you’re stopping for the day, then you can knead the eraser fairly vigorously to clean it. The cleaning process is just like the process you used when breaking in your new eraser.
How does kneading the eraser clean it? The charcoal that the eraser has picked up as you worked is absorbed into the eraser’s material.
Over time and with regular use, your kneaded eraser will become darker and darker as it absorbs more of the charcoal, graphite, or other media that you use to draw. When your kneaded eraser begins to look like a hardened lump of coal, then it is probably time to replace it with a new eraser.
Making the Decision
Do you need a kneaded eraser? Most artists and instructors would agree that you do. In fact, more than one artist has noted that the kneaded eraser is the most versatile drawing tool in their kit.
We have established the need for this type of eraser for artists of all levels, but which one is the best-kneaded eraser?
Chances are good that if you asked a dozen different artists, you would get a dozen different answers. Perhaps the wisest thing that you can do is to experiment with different erasers until you find the one that’s right for you. Keep in mind that you may find that certain kneaded erasers work better with certain drawing mediums, in which case, you may have more than one favorite kneaded eraser.